Make a plan
Before you start turning the screwdriver and ripping into your dashboard, set aside time to plan out the entire installation process. It wasn't until I was looking at a colorful fistful of stock radio wires--with no wiring diagram for reference--that I realized my confidence--er, haste--wasn't going to get me anywhere (it turns out that the 50 feet of speaker wire I assumed would be more than enough for a tiny Mustang, is about three feet short when you finish all the splicing, meaning I had to rerun all the wiring.
I'm not kidding about this. If there's one piece of advice you have to follow it is this: Read through each component's instructions to create a master installation plan. Know what you have, where each piece is going to go, and what extra tools it will take to connect everything. Make sure that you're confident that once you pull apart your dashboard you'll be able to fit it back together. Check literature about your car to make sure you don't need extra adapters such as a custom radio faceplate, or, especially with older or imported vehicles, to make sure there are no non-standard components behind the radio (such as a separate amplifier buried deep within the console) that might greatly complicate the process. Finally, get a big piece of paper and draw a diagram that details where every wire will run. This will organize your thoughts and uncover any potential problems.
In addition to all your new equipment you're going to need wire cutters, black tape, crimpers, pliers, screwdrivers, a rubber mallet, a drill, a Dremel, a ratchet set, flashlight, wire tubing, double sided tape and wire tires to get the job done.
STEP 1: Replacing the Head Unit
When purchasing a head unit (the in-dash radio that controls your system), make sure you chose the appropriate size for your car. Head units are sized as single-din (a 180 x 50 mm panel) or double-din (180 x 100 mm panel) and you can often purchase an adaptor plate to fit a single-din unit in your double-din vehicle. The opposite was true for my car: I installed a double-din 7inch touch screen head unit, the Kenwood DDX-6019 available at www.Kenwood.com. Keep in mind that depths, although largely standard, could vary, so pay attention to how much space you have.
To make the installation much easier, you should also purchase a wire harness designed specifically for your vehicle's make and model. This will save you from having to cut any wires inside your dash, and, trust me, that's well worth the $20 you should expect to pay for a harness. Before you begin to disassemble your dash, you can splice the new wiring harness to your new radio by matching wire colors and descriptions. Also attach Kenwood's add-on Ipod control interface (KCA-iP500) and navigation system (KNA-G510) following the product's simple instructions. Once the harness is connected, the rest of the job is plug-and-play. You can find the correct harness and instructions at www.Crutchfield.com.
Armed with your master plan, carefully remove the dashboard components surrounding your radio by removing any set screws or hex bolts securing the fairing and carefully pulling the component away from the vehicle. You should see a couple of set screws holding in the stock radio. Remove these, and slide out the old head unit.
A confusing collection of colorful wires should follow the stock radio. Disconnect these by carefully prying apart the wiring harness connection that connects the stock radio to the vehicle. The harnesses can be tough to pull apart, but with some wiggling it will eventually separate. Disconnect the radio's antenna connection and set the old head unit aside (don't throw it out--if you want to keep your new system when you sell your car, you'll eventually need to re-install the old radio).
I decided to install a Parrot 3200 LS-COLOR hands free kit, which is best done when you're reinstalling the radio head unit. This connects my bluetooth cell phone to the sound system. I can hear calls through the speakers and talk using the supplied microphone. It auto-mutes the music when a call comes in, and it interfaces with the head unit via another wiring harness, making installation very easy.
Next, connect the antenna cable, and slide in your new head unit. But before you start screwing the radio into place, turn on the car and test your connections. If you don't get any sound, or the radio refuses to turn on, or the sound is reversed (right speakers play the left track, or the front speakers play the rear track, etc.) the culprit is likely a faulty splice in the wiring harness. Pull out the radio and recheck your connections.
If all you're doing is swapping out you radio, follow your system's instructions to fully secure the head unit and put your dashboard back together. You're done. Enjoy your new system.
Tips
Here is a close up of the after market harness(left) and the radios harness(right).
Welcome to our website. If you continue to browse and use this website, you are agreeing to comply with and be bound by the following terms and conditions of use, which together with our privacy policy govern Masten Enterprises Pty Ltd’s relationship with you in relation to this website. If you disagree with any part of these terms and conditions, please do not use our website.
The term ‘Masten Enterprises Pty Ltd’ or ‘us’ or ‘we’ refers to the owner of the website whose registered office is . The term ‘you’ refers to the user or viewer of our website.
The use of this website is subject to the following terms of use:
Fraud Prevention
DIG Options use Maxmind for preventing fraud by the unauthorised use of a credit card to purchase our goods. If your purchase present a high risk for us with the card used, DIG Options will deduct a small amount from the same credit card and require you to confirm this small amount before we ship the goods. If you cannot confirm the correct amount we will refund the payment and cancel the sale.
Product Warranty
DIG Options products are covered by a minimum 1 year warranty from the original purchase date - please check the product for warranty term as this can vary from 1 year up to 5 years depending on the product. If you are unsure please contact us.
All items should be 'bench tested' before installation. Although all items are quality inspected before shipping some items may be mishandled during shipping and cause failure - we pack well to minimise this risk.
Important. In the event of a return, DIG Options will under no circumstance cover costs associated with installation/any labour from an installer not recommended/approved by DIG Options. DIG Options cover the product warranty/postage costs (to and from the purchaser) only.
This privacy policy sets out how we uses and protects any information that you give us when you use this website.
We are committed to ensuring that your privacy is protected. Should we ask you to provide certain information by which you can be identified when using this website, then you can be assured that it will only be used in accordance with this privacy statement.
We may change this policy from time to time by updating this page. You should check this page from time to time to ensure that you are happy with any changes.
What we collect
We may collect the following information:
What we do with the information we gather
We require this information to understand your needs and provide you with a better service, and in particular for the following reasons:
Security
We are committed to ensuring that your information is secure. In order to prevent unauthorised access or disclosure, we have put in place suitable physical, electronic and managerial procedures to safeguard and secure the information we collect online.
How we use cookies
A cookie is a small file which asks permission to be placed on your computer's hard drive. Once you agree, the file is added and the cookie helps analyse web traffic or lets you know when you visit a particular site. Cookies allow web applications to respond to you as an individual. The web application can tailor its operations to your needs, likes and dislikes by gathering and remembering information about your preferences.
We use traffic log cookies to identify which pages are being used. This helps us analyse data about webpage traffic and improve our website in order to tailor it to customer needs. We only use this information for statistical analysis purposes and then the data is removed from the system.
Overall, cookies help us provide you with a better website by enabling us to monitor which pages you find useful and which you do not. A cookie in no way gives us access to your computer or any information about you, other than the data you choose to share with us.
You can choose to accept or decline cookies. Most web browsers automatically accept cookies, but you can usually modify your browser setting to decline cookies if you prefer. This may prevent you from taking full advantage of the website.
Links to other websites
Our website may contain links to other websites of interest. However, once you have used these links to leave our site, you should note that we do not have any control over that other website. Therefore, we cannot be responsible for the protection and privacy of any information which you provide whilst visiting such sites and such sites are not governed by this privacy statement. You should exercise caution and look at the privacy statement applicable to the website in question.
Controlling your personal information
You may choose to restrict the collection or use of your personal information in the following ways:
We will not sell, distribute or lease your personal information to third parties unless we have your permission or are required by law to do so. We may use your personal information to send you promotional information about third parties which we think you may find interesting if you tell us that you wish this to happen.
If you believe that any information we are holding on you is incorrect or incomplete, please write to or email us as soon as possible at the above address. We will promptly correct any information found to be incorrect.
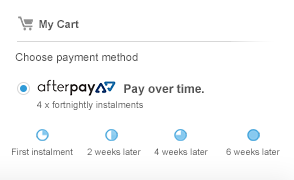
Simple instalment plans available instantly at checkout
Use your existing debit or credit card
No long forms, instant approval online
Pay fortnightly, enjoy your purchase straight away!
All your need is:
1) An Australian Visa or Mastercard debit/credit card; 2) To be over 18 years of age; 3) To live in Australia
To see Afterpay's complete terms, visit https://www.afterpay.com.au/terms
© 2024 Afterpay